Must Have Makeup Brushes in Your Makeup Kit
Brushes are the most important thing in your makeup kit. If you have excellent quality brushes but don’t have expensive makeup it is all ok and you can still achieve a great makeup look. On the other hand, if you have poor quality brushes even with the most expensive makeup products it will be a real challenge for you to create a decent makeup look. You will have to try really hard! Luckily, the Online Makeup Academy has taken the guesswork out of finding the best brushes to begin with in your professional kit, as they have included a full and complete professional brush set in their Essential and Master makeup kits! It’s also very important to know how to correctly use a brush or what product to apply with a certain brush – here we will give you the breakdown of the must have brushes to always have in your kit, and their specific uses!
Many makeup artists may have very expensive brushes in their kit and they will treat them like their “babies”, but brushes don’t necessarily have to be expensive to be of good quality – either way, your best brushes will be the star of your makeup kit, always! You can begin with just a few of the most important tools, and one by one, build upon the brushes, selecting and investing in additions that you will personally use depending on your clientele and techniques as you gain your own individual experience.
It is true, when you have soft brushes your makeup application will become a dream and will look flawless. Below you will find must have brushes for your kit (as well as some extra brushes that are also always good to have, and of course tips!). These are the basics you can’t work without.
1. The first very important tool (though not a brush) is a beauty sponge. Nowadays we have a huge variety of them on the market and you can find great quality ones even in drugstores! See, when we mentioned about great quality brushes, we don’t mean they have to be super expensive! You can find amazing brushes for under $10. The same with sponges, I love drugstore ones even more than the original. The beauty sponge tool will distribute and blend your foundation so well that it will look flawless on your face, almost like an airbrush.
2. Concealer brush. Or you can find a dual foundation/concealer brush if you do not prefer to apply foundation with fingers on your clients. This would be a small synthetic brush that will allow you to apply concealer onto the areas where you need to lighten the skin: under the eye area, bridge of the nose, forehead, and jaw. You can blend it with a beauty sponge.
3. Powder brush. A fluffy brush that will help you set foundation. Maybe it is a good idea to get a powder brush that is on a smaller side as your clients will have different faces and sometimes large fluffy powder brush will be just too much for someone’s smaller framed face. Additionally, with a smaller brush you will also have more control.
4. Powder contour/blush brush. You can use one brush for 2 products: for sculpting powder and for a blush. Just rub off the excess bronzer on a dry paper towel and then go for the blush. An angled brush will give you more control and will apply a necessary amount of the product exactly to your desired areas.
5. Highlighter brush. You can use this brush first to set the under eye area with powder and later apply a highlighter with it on the highest points of your cheeks, on your cupid’s bow, jaw, etc… So basically you are saving space in your kit making it lighter for you to travel with it. This one is a smaller powder brush, it has to be small so that it is convenient to use it on smaller areas.
6. Eye brow brush. This will be great if again you will have a dual ended brush: an angled thin brush on one side and a spoolie on the other side. It is very convenient as you brush the brows first with a spoolie and then you apply product with the brush. If you applied too much this spoolie will also help you out. You can brush the brows with it to get rid of any excess product.
7. Eye liner brush. Here you can choose the shape that you like the most: thick, thin and tiny, angled. Any one that will make you more confident while applying eye liner will be great!
8. Big fluffy brush. To apply a transition color and to define the crease you will need this brush. It applies eye shadow like a hue which can be built up according to the eye look you are going to create!
9. More dense brush for the crease. To intensify the eye shadow in your crease you will need this brush. It allows you to add eye shadow more precisely into the crease.
10. Shader brush. This brush is designed to pack eye shadow onto the eye lid. It is better to choose a medium sized brush so it will fit to any eye shape even a small one.
11. Pencil brush. You will need this brush to apply highlighter into the inner corner of your eye, or to smudge the color along the lash line.
12. Lipstick brush. The name of this brush says by itself, you will use it to apply lipstick onto your client. Flat and synthetic brush is perfect for this.
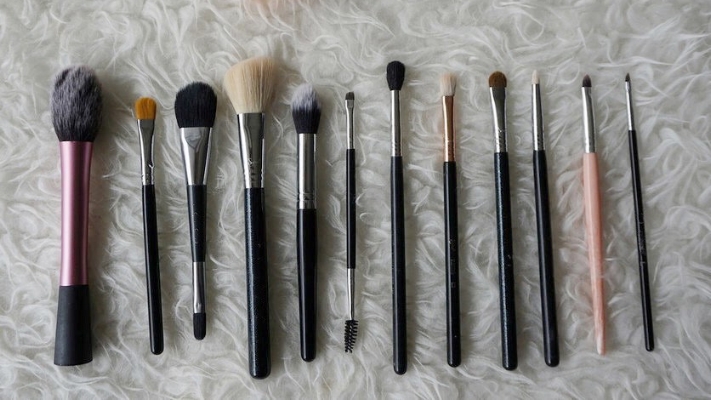
Those are the basic brushes you will need in your kit to apply makeup on your clients. Of course you may choose more to make your work easier and faster but these are the main brushes it is almost impossible to work without. To find your own set of perfect brushes, read a lot of reviews, try them out and see what works best and is most convenient for you (each artist’s preferences will vary)!
If you decide to invest in additional brushes that will help you improve your makeup game you should consider these additional useful tools:
1. Flat definer brush. It makes smoking out the lower lash line so much easier and more precise. It allows you to get to the lash line as close as possible, making your smokey eyes perfect!
2. Synthetic brush. This brush will help you to apply cream products onto the eye lid: cream eye shadows, gloss, etc, as well as blend it out to create a nice effect. Cream eye shadows are often used as a base for your powder eye shadows.
3. Pointy crease brush. You will need one to apply eye shadows into the crease the most precisely, usually with the darkest color. It can be any size you are comfortable with. Keep in mind you will have to be experienced to work with this brush, as your application must be very neat.
4. Super tiny crease brush. You might want to use it to blend the eye shadow edges into the skin, to hide all the sharp lines and make the transition of an eye shadow into the skin invisible.
Here is some additional insight on brush care:
If you want your brushes to serve you the best, and always look like new, you have to really take good care of them! Product build up can ruin your brushes while dirty brushes used on your clients can ruin your reputation! Wash your brushes thoroughly and regularly, at least once a week (the ones you use for yourself!), 2 times a week for the ones you use on your clients! Clean brushes apply products in the best possible way!
In between washes you can and must use a special brush cleanser which disinfects as well as conditions them. MAC Cosmetics offers a great brush cleanser/sanitizer. You also have to sanitize and cleanse each brush in between your clients if you have them one after another or don’t have enough time for a deep clean! Keep in mind, this solution also needs time to dry so it is better for a makeup artist to have duplicate brushes in their kit; you will apply makeup with one set while another one will be drying!
If you need to clean your brush the quickest and most effective way (and please note that this is only if you are working with this brush on the same client) you may remove powder products by using Vera Mona cleanser or its dupe. It is a kind of sponge that lets you get rid of the color on your brushes and then take another one without mixing them.
Choosing the right brush for a certain application in the beginning of your career is hard but as you become more experienced you will not even pay attention to what brush to use for what, it will pop automatically in your head and become second nature. With experience and practice, you will learn, and be skilled enough to multitask your brushes in order to keep your kit most streamlined.


